こんにちは、JS2IIUです。
StreamlitはPythonで手軽にWebアプリケーションを構築できるフレームワークとして、多くの機械学習・データ分析エンジニアに支持されています。標準のウィジェットだけでも多くのアプリは構築できますが、「オリジナルのUIを作りたい」「JavaScriptライブラリの機能を使いたい」と感じる場面も少なくありません。
例えば、独自のインタラクティブ可視化が必要なときや、複雑な操作が可能なUIコンポーネントを統合したいとき、あるいはデータサイエンス用の特殊な入力インターフェースを作りたいとき、標準のStreamlit APIだけでは対応が難しいことがあります。
この課題を解決するのが、Streamlitの st.components.v2.component です。この機能を使うことで、HTML・CSS・JavaScript を組み合わせたカスタムコンポーネントを自作し、Streamlitアプリに統合できます。つまり、StreamlitのUIを自分仕様に拡張できる強力な方法です。
本記事では、この st.components.v2.component を基礎から丁寧に解説しながら、最小構成のコンポーネントから、機械学習アプリへ応用できる実践的な例まで紹介します。今回もよろしくお願いします。
st.components.v2.component とは何か
st.components.v2.component – Streamlit Docs
Streamlitのバージョンに注意
Streamlitのバージョンに注意が必要です。この記事を書いている2025年11月現在、Streamlitのバージョンは1.51.0です。インストール済みのStreamlitのバージョンを確認するには、
streamlit --versionもし古いバージョンを使っている場合は、以下のコマンドでアップデートして下さい。
python -m pip install --upgrade streamlit以下のように表示されればアップデート成功です。
Successfully installed streamlit-1.51.0コンポーネント定義とマウントの概念
st.components.v2.component は、「カスタムコンポーネントを定義するための関数」です。この関数を呼ぶと、コンポーネントをストリームリットアプリ上に配置(マウント)するための「呼び出し可能なオブジェクト」が返ってきます。
つまり、次のような構造になっています。
- component(…) で「名前・HTML・CSS・JS」を指定し、コンポーネント定義を作る
- 戻り値の callable を使ってアプリ内の好きな場所に表示する
この「定義」と「マウント」が分離している点は重要です。定義をループ中で毎回行ってしまうと、同名コンポーネントの再定義が発生し、意図しない挙動になることがあります。
パラメータの詳細
component(name, *, html=None, css=None, js=None)主な役割は次のとおりです。
name
コンポーネントの識別名。アプリ内でユニークであること。html
コンポーネントの土台となるHTML。文字列またはアセットファイルで指定。css
任意のスタイル設定。こちらも文字列またはファイルで指定可能。js
コンポーネントの動作やイベント処理を担うJavaScript。
注意点として、html と js の両方を None にすることはできません。少なくともどちらか必要です。
呼び出し時に返されるオブジェクトは BidiComponentResult という双方向データ通信を持つオブジェクトで、JavaScript側から送られるデータやトリガーを受け取れます。これにより、Streamlitアプリ内で高度なインタラクティブUIを構築できます。
基本的な使い方
まずは、最小構成でコンポーネントを作る方法を説明します。ここでは「クリックするとメッセージを返すだけの簡単なコンポーネント」を作って動作を理解します。
最小構成のカスタムコンポーネント(HTMLとJSのみ)
以下のコードでは、ボタンがクリックされると、その情報をStreamlit側に返すコンポーネントを定義しています。

Streamlit 側のコード
import streamlit as st

JS = """
export default function(component) {
    const { setTriggerValue } = component;
    const links = document.querySelectorAll('a[href="#"]');

    links.forEach((link) => {
        link.onclick = (e) => {
            setTriggerValue('clicked', link.innerHTML);
        };
    });
}
"""

my_component = st.components.v2.component(
    "inline_links",
    js=JS,
)

result = my_component(on_clicked_change=lambda: None)

st.markdown(
    "こちらをクリックして下さい [リンク](#)."
)

if result.clicked:
st.write(f"{result.clicked} がクリックされました。")コード解説
- インポート:
import streamlit as st— Streamlit API を使う準備をしています。 - JS 定義変数: JS — ES モジュール形式の文字列で、
export default function(component) { ... }を定義しています。 - コンポーネント引数の分解:
const { setTriggerValue } = component;— 渡された component オブジェクトからsetTriggerValueを取り出しています(Streamlit 側へ値を通知するための関数)。 - リンク選択:
const links = document.querySelectorAll('a[href="#"]');— ページ内のhref="#"を持つ全ての<a>要素を選択します。 - イベント登録:
links.forEach((link) => { link.onclick = (e) => { setTriggerValue('clicked', link.innerHTML); }; });— 各リンクにクリックハンドラを付け、クリック時にsetTriggerValueを呼んでキー名 ‘clicked’ と値(リンクのテキスト)を送ります。 - コンポーネント登録:
my_component = st.components.v2.component("inline_links", js=JS)— 名前 “inline_links” でインライン JS コンポーネントを作成します(v2 コンポーネント API を使用)。
- コンポーネントのマウントとコールバック:
result = my_component(on_clicked_change=lambda: None)— コンポーネントを挿入してon_clicked_changeコールバックを渡しています(トリガー値が変わると Streamlit 側で再評価/コールされる)。
- Markdown 表示:
st.markdown("こちらをクリックして下さい [リンク](#).")— 実際にクリック対象のリンクをページに出力しています(href=”#”)。 - 結果表示:
if result.clicked: st.write(f"{result.clicked} がクリックされました。")— コンポーネントから送られた ‘clicked’ 値が存在すれば、その内容を表示します。 - 全体の挙動フロー: ユーザが Markdown のリンクをクリック → JS がそのリンクを検出して
setTriggerValue('clicked', ...)を呼ぶ → Streamlit がトリガー変化を検知してスクリプトを再実行/on_clicked_changeを呼ぶ →result.clickedに値が入りメッセージを表示する、という流れです。 - 注意点 / 改善案:
- 現状は全ページの
a[href="#"]を対象にするため、コンポーネント外のリンクも拾います。対象を限定したければ、Markdown に特定の id を付与してその要素のみをセレクトするのが安全です。 - DOM の準備タイミングによってはリンクが存在しない場合があるので、
DOMContentLoaded待ちや再検索の処理を入れると堅牢になります。 st.components.v2の挙動は Streamlit のバージョンに依存するため、意図した動作をしない場合はバージョン確認と API 仕様参照を行ってください。
- 現状は全ページの
このように、非常にシンプルな UI でも、HTML と JavaScript を組み合わせることで自由にコンポーネントを作れます。
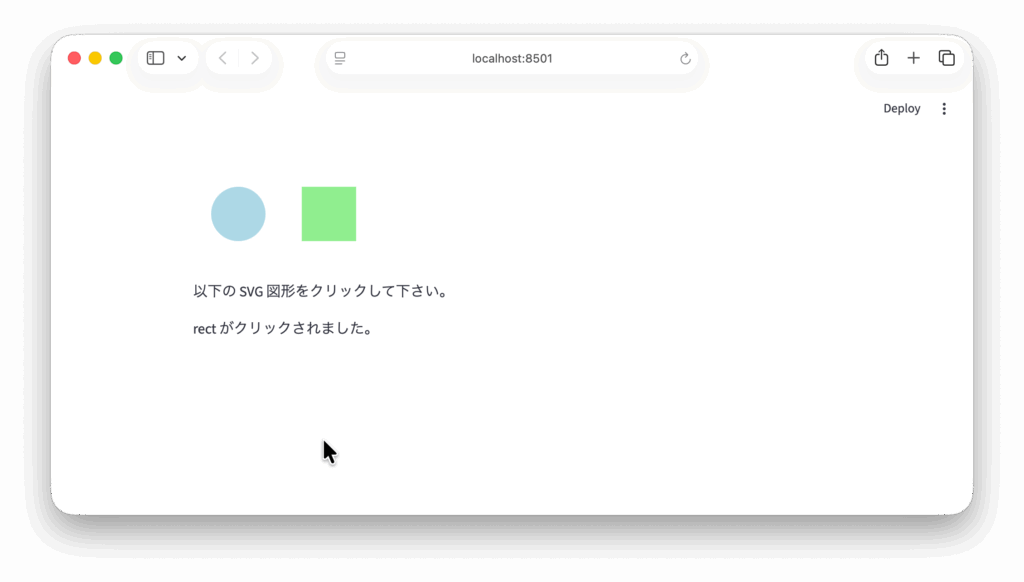
実践:クリック可能な SVG 図形コンポーネント
ここでは、より実践的な例として「SVG図形をクリックするとどの図形をクリックしたかをPython側に返すカスタムコンポーネント」を作成します。
機械学習アプリでは、モデルの推論結果をSVG上に表示したり、ユーザーが領域をクリックしてアノテーションするなどの用途があります。この仕組みはその基礎として非常に応用しやすいものです。
作るものの概要
- 画面に2つの図形(円と四角)を表示
- 図形をクリックすると「circle」「rect」のどちらをクリックしたかをPythonに送信
- Python側では結果を受け取り、表示したりモデル推論の入力に利用したりできる
コンポーネントのHTML + JavaScript
import streamlit as st


# コンポーネント登録を再実行時に重複させないようキャッシュ
@st.cache_resource
def _get_clickable_svg():
    return st.components.v2.component(
        name="clickable_svg",
        html="""
            <svg width="200" height="100">
                <circle id="circle" cx="50" cy="50" r="30" fill="lightblue"></circle>
                <rect id="rect" x="120" y="20" width="60" height="60" fill="lightgreen"></rect>
            </svg>
        """,
        js="""
            // Improved v2 component: handle cases where Streamlit passes a component object
            // as the first argument (it contains setTriggerValue and parentElement).
            export default function(rootOrComponent, props) {
                try { console.log('[component] mounted. arg0=', rootOrComponent, 'props=', props); } catch (e) {}

                let component = null;
                let root = null;
                let trigger = null;

                // If first arg is the component object provided by Streamlit v2
                if (rootOrComponent && typeof rootOrComponent === 'object' && typeof rootOrComponent.setTriggerValue === 'function') {
                    component = rootOrComponent;
                    trigger = component.setTriggerValue.bind(component);
                    // mount into the provided parentElement if available
                    root = component.parentElement || document.getElementById('clickable_svg_root') || document.body;
                    console.log('[component] detected component object, parentElement=', component.parentElement);
                } else {
                    // otherwise first arg is the root DOM element
                    root = rootOrComponent || document.getElementById('clickable_svg_root') || document.body;
                    if (props && typeof props.setTriggerValue === 'function') trigger = props.setTriggerValue.bind(props);
                }

                function sendClicked(name) {
                    try {
                        console.log('[component] sendClicked', name, 'using trigger=', !!trigger);
                        if (trigger) {
                            trigger('clicked', name);
                            console.log('[component] used trigger/setTriggerValue');
                            return;
                        }
                        if (typeof sendMessage === 'function') {
                            sendMessage({clicked: name});
                            console.log('[component] used global sendMessage');
                            return;
                        }
                        if (props && typeof props.sendMessage === 'function') {
                            props.sendMessage({clicked: name});
                            console.log('[component] used props.sendMessage');
                            return;
                        }
                        if (window && window.parent && typeof window.parent.postMessage === 'function') {
                            window.parent.postMessage({type: 'streamlit:component', value: {clicked: name}}, '*');
                            console.log('[component] used postMessage fallback');
                            return;
                        }
                        console.log('[component] no send method available');
                    } catch (e) { console.error('[component] sendClicked error', e); }
                }

                // find elements inside the root (root should be a DOM node)
                let circle = null;
                let rect = null;
                try {
                    if (root && typeof root.querySelector === 'function') {
                        circle = root.querySelector('#circle');
                        rect = root.querySelector('#rect');
                    }
                } catch (e) { console.error(e); }
                if (!circle) circle = document.getElementById('circle');
                if (!rect) rect = document.getElementById('rect');

                console.log('[component] found elements:', {circle, rect});

                function markClicked(el) {
                    try {
                        el.style.transition = 'fill 0.15s';
                        const prev = el.getAttribute('fill');
                        el.setAttribute('fill', '#ffcc00');
                        setTimeout(() => el.setAttribute('fill', prev), 200);
                    } catch (e) {}
                }

                if (circle) circle.addEventListener('click', (e) => { markClicked(circle); sendClicked('circle'); });
                if (rect) rect.addEventListener('click', (e) => { markClicked(rect); sendClicked('rect'); });

                // cleanup
                return () => {
                    try {
                        if (circle) circle.replaceWith(circle.cloneNode(true));
                        if (rect) rect.replaceWith(rect.cloneNode(true));
                    } catch (e) {}
                };
            }
        """
    )


clickable_svg = _get_clickable_svg()

result = clickable_svg(on_clicked_change=lambda: None)

st.markdown("以下の SVG 図形をクリックして下さい。")
if result and result.clicked:
    st.write(f"{result.clicked} がクリックされました。")
ポイント解説
- インポート:
import streamlit as st— Streamlit API を利用します。 - キャッシュ:
@st.cache_resource— コンポーネント登録をキャッシュして、Streamlit のリラン時に同じコンポーネント名が重複登録されるのを防ぎます。 - コンポーネント定義:
st.components.v2.component(...)を返す_get_clickable_svg()を定義しており、これを呼んでコンポーネントを取得します。 - HTML 部分: html に直接 SVG マークアップを埋め込み(幅200×高さ100)、
<circle id="circle">と<rect id="rect">を配置します。 - JS 部分(ES module): js は
export default function(rootOrComponent, props) { ... }で書かれており、Streamlit v2 の呼び出し形に合わせたマウント関数を提供します。 - 第一引数の検出: 第一引数がコンポーネントオブジェクト(
setTriggerValueを持つ)か DOM root かを判定し、前者ならcomponent.parentElementを描画先root、component.setTriggerValueを送信関数(trigger)として使います。 - 送信ロジック: クリック時は優先して
trigger('clicked', value)(v2 のsetTriggerValue相当)を呼び、無ければ順にsendMessage(...)/props.sendMessage(...)/window.parent.postMessage(...)をフォールバックで使います。 - 要素検出: 描画先の
rootに対してroot.querySelector('#circle') / #rectで要素を取得し、見つからなければdocument.getElementByIdで探します。 - イベント登録:
circle.addEventListener('click', ...)とrect.addEventListener('click', ...)を設定して、それぞれクリック時にsendClicked('circle')/sendClicked('rect')を呼びます。 - 視覚フィードバック: クリック時に一時的に fill を
#ffcc00に変えて 200ms 後に元に戻す処理があり、ハンドラが発火したか分かるようになっています。 - クリーンアップ: コンポーネントのアンマウント時に返される関数でイベントを除去し、要素を
cloneNode(true)と置換してリスナを解除します。 - コンポーネント利用:
clickable_svg = _get_clickable_svg()→result = clickable_svg(on_clicked_change=lambda: None)でマウントし、if result and result.clicked: st.write(...)で Python 側に届いた値を表示します。 - デバッグ情報: JS 側に console.log が多数あり、マウント時・要素検出時・送信経路選択時の状態がブラウザのコンソールに出ます(問題切り分けに有用)。
- 使い方の期待結果: ブラウザで円をクリックすると
result.clicked == 'circle'になり「circle がクリックされました。」が表示されることを意図しています。
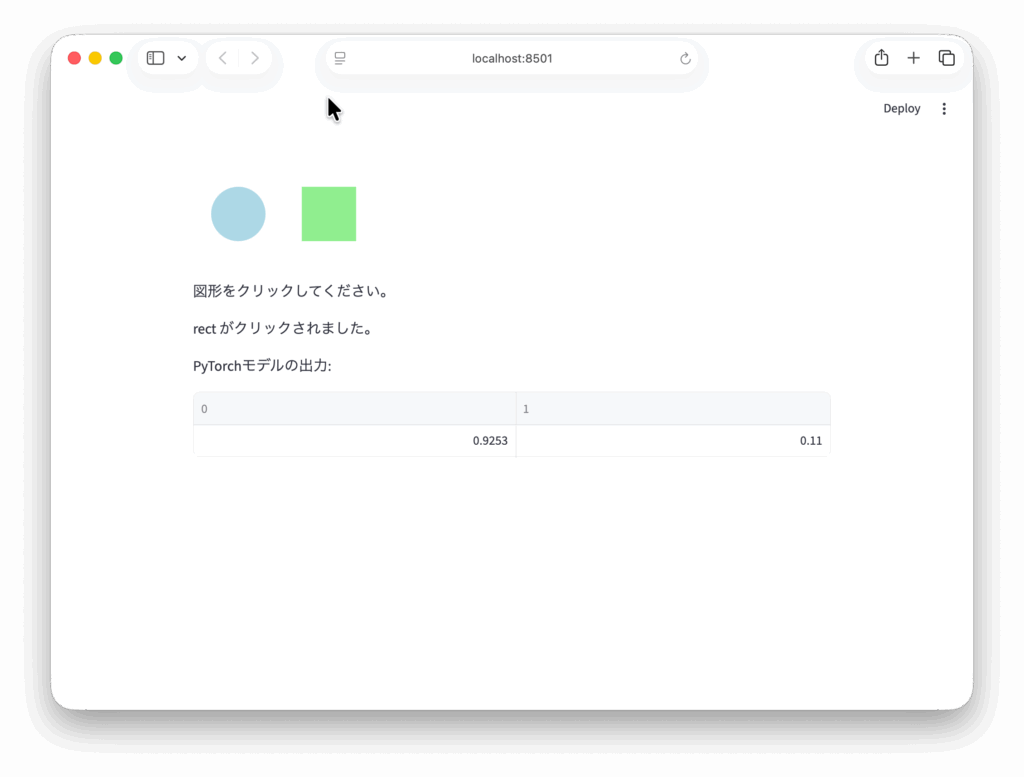
Streamlit 側での呼び出しと PyTorch 推論と組み合わせる例
以下は PyTorch の簡単な分類モデルと組み合わせた例です。
import streamlit as st
import torch
import torch.nn as nn

# PyTorchの簡易モデル
class SimpleModel(nn.Module):
    def __init__(self):
        super().__init__()
        self.fc = nn.Linear(2, 2)  # circle/rect を 2クラス分類するためのダミー

    def forward(self, x):
        return self.fc(x)

model = SimpleModel()

# コンポーネント登録を再実行時に重複させないようキャッシュ
@st.cache_resource
def _get_clickable_svg():
    return st.components.v2.component(
        name="clickable_svg",
        html="""
            <svg width="200" height="100">
                <circle id="circle" cx="50" cy="50" r="30" fill="lightblue"></circle>
                <rect id="rect" x="120" y="20" width="60" height="60" fill="lightgreen"></rect>
            </svg>
        """,
        js="""
            // Improved v2 component: handle cases where Streamlit passes a component object
            // as the first argument (it contains setTriggerValue and parentElement).
            export default function(rootOrComponent, props) {
                try { console.log('[component] mounted. arg0=', rootOrComponent, 'props=', props); } catch (e) {}

                let component = null;
                let root = null;
                let trigger = null;

                // If first arg is the component object provided by Streamlit v2
                if (rootOrComponent && typeof rootOrComponent === 'object' && typeof rootOrComponent.setTriggerValue === 'function') {
                    component = rootOrComponent;
                    trigger = component.setTriggerValue.bind(component);
                    // mount into the provided parentElement if available
                    root = component.parentElement || document.getElementById('clickable_svg_root') || document.body;
                    console.log('[component] detected component object, parentElement=', component.parentElement);
                } else {
                    // otherwise first arg is the root DOM element
                    root = rootOrComponent || document.getElementById('clickable_svg_root') || document.body;
                    if (props && typeof props.setTriggerValue === 'function') trigger = props.setTriggerValue.bind(props);
                }

                function sendClicked(name) {
                    try {
                        console.log('[component] sendClicked', name, 'using trigger=', !!trigger);
                        if (trigger) {
                            trigger('clicked', name);
                            console.log('[component] used trigger/setTriggerValue');
                            return;
                        }
                        if (typeof sendMessage === 'function') {
                            sendMessage({clicked: name});
                            console.log('[component] used global sendMessage');
                            return;
                        }
                        if (props && typeof props.sendMessage === 'function') {
                            props.sendMessage({clicked: name});
                            console.log('[component] used props.sendMessage');
                            return;
                        }
                        if (window && window.parent && typeof window.parent.postMessage === 'function') {
                            window.parent.postMessage({type: 'streamlit:component', value: {clicked: name}}, '*');
                            console.log('[component] used postMessage fallback');
                            return;
                        }
                        console.log('[component] no send method available');
                    } catch (e) { console.error('[component] sendClicked error', e); }
                }

                // find elements inside the root (root should be a DOM node)
                let circle = null;
                let rect = null;
                try {
                    if (root && typeof root.querySelector === 'function') {
                        circle = root.querySelector('#circle');
                        rect = root.querySelector('#rect');
                    }
                } catch (e) { console.error(e); }
                if (!circle) circle = document.getElementById('circle');
                if (!rect) rect = document.getElementById('rect');

                console.log('[component] found elements:', {circle, rect});

                function markClicked(el) {
                    try {
                        el.style.transition = 'fill 0.15s';
                        const prev = el.getAttribute('fill');
                        el.setAttribute('fill', '#ffcc00');
                        setTimeout(() => el.setAttribute('fill', prev), 200);
                    } catch (e) {}
                }

                if (circle) circle.addEventListener('click', (e) => { markClicked(circle); sendClicked('circle'); });
                if (rect) rect.addEventListener('click', (e) => { markClicked(rect); sendClicked('rect'); });

                // cleanup
                return () => {
                    try {
                        if (circle) circle.replaceWith(circle.cloneNode(true));
                        if (rect) rect.replaceWith(rect.cloneNode(true));
                    } catch (e) {}
                };
            }
        """
    )


clickable_svg = _get_clickable_svg()

# SVGコンポーネントをマウント
result = clickable_svg(key="svg1")

st.write("図形をクリックしてください。")

if result and result.get("clicked"):
    shape = result["clicked"]
    st.write(f"{shape} がクリックされました。")

    # クリックされた図形に応じてTensorを作成
    x = torch.tensor([[1.0, 0.0]]) if shape == "circle" else torch.tensor([[0.0, 1.0]])

    # 推論
    with torch.no_grad():
        output = model(x)
st.write("PyTorchモデルの出力:", output.numpy())コードの流れ
- SVGコンポーネントを表示
- ユーザーが図形をクリックすると result にデータが入る
- shape データに応じて PyTorch のテンソルを生成
- モデルにテンソルを入力して推論
- 出力を表示する
このように、カスタムUIとPyTorchモデルを自然に組み合わせられるのが st.components.v2.component の強みです。
応用:機械学習アプリへの応用アイデア
コンポーネントを使うと Streamlit アプリの表現力が大きく広がります。以下は応用可能な例の一部です。
独自インタラクティブ可視化コンポーネント
- モデルの注意領域を可視化し、ユーザーがクリックで強調情報を得られるUI
- 選択領域をマークするアノテーションツール
- 特徴量重要度を調整しながら推論結果の変化を確認するUI
PyTorch と連携したアプリ例
- 入力画像上の領域をクリックして、部分推論を行う画像分類UI
- テキスト分類モデルのハイライト表示をカスタムHTMLで表示
- モデルの内部特徴マップをHTML CanvasとJSで描画する高度な可視化
Streamlit の標準機能では難しい UI が、HTML/CSS/JS を組み合わせることで自由に構築できます。
まとめ
本記事では、Streamlit の st.components.v2.component を活用し、独自のUIコンポーネントを作成する方法を丁寧に解説しました。
ポイントを整理すると以下の通りです。
- st.components.v2.component は Streamlit アプリに HTML/JS で作るカスタムUIを直接埋め込むための強力な API
- コンポーネントの定義とマウントの流れを理解することが重要
- sendMessage による双方向通信で、Streamlit側でインタラクションを処理できる
- PyTorch などの機械学習モデルと組み合わせることで、より高度なインタラクティブMLアプリを構築可能
- SVGクリックUIなど、応用範囲は非常に広い
最後まで読んでいただきありがとうございました。

コメント